


With an interest in chip tune music must come a certain desire to figure out the best reproduction of those chip tune sounds. Having a synthesizer myself, I always thought creating a chip tune piece was as simple as using a square wave coming out of my analog SH-201. Everyone has a different method, but this was my approach. Despite different approaches, there is a tremendous difference in the sounds produced from any sound chip, let alone those in video game consoles and handheld devices.
For instance, the timbre of a C64 square wave sounds way different than an NES square wave. They are both square waves, yet the aesthetics that make up the sound drastically differs for each system. If you were going to create an NES based chip tune, it wouldn’t help to emulate chip sounds from a C64, or in my case, my analog SH-201. How can someone spot the difference? Inverse Phase, Mr. MAGFest, as some call him, often teaches people the differences, so they could be armed with an applicable sound palette before creating their own chip tunes. Today, I’ll go over some of these differences thanks to a lecture by Inverse Phase titled Music from Old Sound Chips.
Lets get our hands muddy with some basic terminology before we continue.
Square waves are generated by Direct Current (DC), it’s either on, or off. When the sound is on, the wave is high, when the sound is off, the wave is low.
A video game system is generating that square wave by leaving the sound on a certain percent of time. That certain percentage is referred to as “cycles,” which in turn creates the width of the square wave.

When the cycle percentage is low, like 12.5%, that creates a tinny square wave sound, and if it’s 50%, it’s very full and kind of hollow sounding. That’s the basics understanding of the width a square wave has, so lets talk about its length.
Whenever we refer to the length of any sound wave in digital form, we usually refer to its bit depth. However, there are two kinds of bits referenced in old sound chips, Amplitude Bit, and Frequency Bit (or as I refer to it as Pitch Resolution).
Whenever you talk about ‘x’ bit amplitude — say for instance ‘x’ is 16, so 16 bit amplitude — that sound would have 65,000+ different positions of amplitude, from in to out, that the speaker can be positioned in.
8 bit sounds have 256 speaker positions.
4 bit sounds (which is what most 8 bit systems are) have 16 different positions that the speaker could be in! The following picture may help in visualizing what positions the speaker could be in for a 4 bit PCM channel.

The frequency bit or pitch resolution entails how many frequencies a sound might play. The value of the bit is calculated in the same way bit amplitude is calculated. So if you have an 8 bit pitch resolution, then you have 256 different notes, or tones, or in-between notes that the system could play. There is a good reason for why you would want more frequency bits. For instance, when using a pitch wheel to change the pitch of the sound, in order for the sound to venture smoothly into different frequencies, the higher the frequency bit, the more accurate that pitch will sound. Because of this, some systems with low pitch resolutions can’t even produce proper frequencies in correlation to the notes played.
Square waves, triangle waves, white noises, FM, and a few other PCM based sounds make up a huge palette of chip tune music. By now, you can imagine that creating a square wave on a synthesizer may not be the most accurate method to emulate old chip tune sounds. A synthesizer with a high frequency bit will create sounds that were not produced by older sound chips.
Now let’s talk about our video game consoles in some detail. It is said that some of the following sound chips could be purchased from Radio Shack for $10 a pop! Inverse Phase goes more in-depth into explaining the history, the implementation of different sound chips, how they evolved over time, and how or if they can be purchased. I’d only like to go over two of my favorite sound chips. If I don’t cover your favorite video game console, you can always ask Inverse Phase how you can reproduce sounds from that specific console.
NES

The CPU of the NES was built by Ricoh. Nintendo liked the 6502 processor and requested a sound chip to be crammed in, which created the wonderful sounds of Tetris, Contra, and other NES favorites. The chip has 4 voices, with 4 bit amplitude; which means the NES plays 4 sounds simultaneously with 16 different volume positions that each sound could be in.
Here is a graph visually explaining the capabilities the NES has.

Channel one and two has square waves (or pulse) with cycles of 12.5%, 25%, 50%, and 75%, but only those two channels. Also you can’t drop the square wave below 55hz.
The third channel is a triangle wave which creates deep sounds fitted with aliasing. The triangle wave is actually a hack of the square wave, in which a counter creates steps in volume to produce a triangle wave. Because the CPU is controlling the volume to produce the triangle shape, there is no control over the volume of the triangle wave. This creates a deep bass, and may have been why the NES blared bass at times.
The fourth channel is a white noise channel.
And there is also a PCM channel which could be considered an extra.
Remember the bongos or steel drums from Super Mario 3? Or the Ninja turtles “Hey!’ sound? That was the PCM channel. It’s a channel that could do delta samples (a technology that was invented by the phone companies in the 1940s), which Nintendo adopted to compress sound.
The remarkable thing about the NES is that it has an 11 bit Pitch Resolution, meaning that there could be a lot more tones in between each note.
Game Boy

* Some retractions are made to the Game Boy section.
After the success of the NES system, Nintendo used a Z80 chip, used in TI calculators which could be run on AA batteries. They asked Sharp to cram a sound chip on the Z80 with the same mechanics that the NES had, but with two exceptions. One, the digital PCM channel is gone. Two, they replaced the triangle channel with a wave channel, where you can draw your own wave. (This Z80 is said to be on the Genesis as well as Game Gear, combining the Z80 with SN76489, which is the same sound chip in the Colecovision and TI99 computers.)
Instead of a counter that creates the square-shaped triangle wave on the NES, you could instead store in memory a sound wave, and have the Game Boy shoot it out into a loop. A lot of the grungy sounds that you may hear from chip tune artists will be the result of them using this channel.
Here is a graph visually explaining the capabilities the Game Boy had.

The Game Boy has the same capacity the NES had with its channels, and the sound is still 4 bits in amplitude as well as 11 bit pitch resolution. But the best thing Nintendo added to the Game Boy was to pump out sounds in stereo. Channels are only hard panned however. They can be positioned either Left, Right, or center, all on a per-channel basis.
Knowledge is power, and knowing this, it is possible to limit your sound to restrictions necessary to emulate NES or Game Boy with plugins or FX modules. This may limit the amplitude bit, but it will not limit the pitch resolution, while it would be fairly easy to limit yourself to three or four tracks. You will never be able to emulate the sounds as accurately, unless you purchase the sound chips featured in the console yourself and solder them to function. Or perhaps you could purchase an NES or Gameboy, while scouting for some third-party peripheral that you could connect to the system. The importance of emulation is always up to the artist, but it’s far more important to just have fun creating chip tunes.
There were a lot more sound chips that Inverse Phase went through, and I would highly recommend going to his panel on old sound chips the next time he does one. Of course, if you have questions on sound chips, or if you have any general questions on how to produce the best quality sound from your favorite system, you can always contact Inverse Phase via facebook or twitter. I’m very happy to have gone to this panel and only wish more people like him were willing to teach us. I hope that this article has been helpful to you, please feel free to comment and let us know.
I’d again like to thank Inverse Phase for providing some of these images, especially the animated square wave. Thank you Brendan.
Tags: Brendan Becker, C64, Chip Tunes, Gameboy, Inverse Phase, MAGFest 11, NES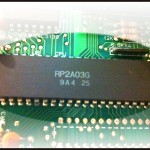


Thanks for posting, that was really interesting.
No problem. I had to make some retractions to the article. Brendan Becker spotted an error on the Game Boy section that I had mistaken for the AY-3-8910 in his panel.
Yo! Incredible summary of the soundchips presentation!
If you guys want to watch some more craziness about sound chips and capabilities with less reading and more listening, please check out my video: http://www.youtube.com/watch?v=1CO6ljU3vMs